I love picture collages and use them a lot! Ive got framed collages with holiday pictures hanging in the downstairs loo and one beautiful large one of black and white pictures of the kids as babies framed and hanging in our bedroom. Every time I look at it I spot a different picture!
Whenever I use these collages people admire them and ask me how I made them - well here's how!
- Download a free piece of software from Google called Picasa.
Picasa is dead useful - it's a photo library that allows you to look at all the photographs on your computer, do simple editing on them and create some really fun and useful stuff. It's aimed at your normal family user so it's really user friendly and intuitive to use.
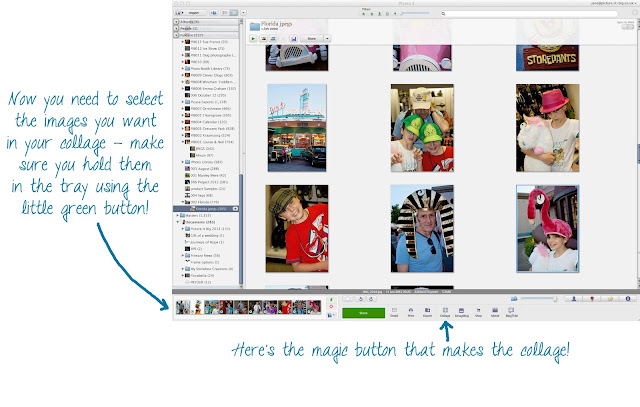
Once you've downloaded Picasa and told it which folders to look in for pictures (it might take a while to find all the pictures especially if you have a lot!) then you will see a screen like the one above. Scroll down and you will see all your pictures in one continuous stream.
Click on an image to see a larger version - you can do lots of cool edits on it here too - have a play with them all - you can easily undo any changes by pressing the "undo" button.
If you want to use this image in your collage, then press the little green button at the bottom by the "tray" to keep it there. Carry on selecting other images to include in your collage and hold them in the tray at the bottom by pressing the green button. You can select as many images as you like - I've done a collage with over 300! You need at least 3 though! You can select from any folder on your computer simply by scrolling down. Remember to hold the pic in the tray with the green button!
 Once you have selected all your images you're ready to make your collage. Along the bottom of the screen there are a number of options, including one to make a collage. If it isn't shown, then right click on one of the other buttons at the bottom and you'll get this pop up window:
Make sure you add in the collage button and then press OK and close the window. If you have problems with this, you can use the menu at top of the page: Create / Create Picture Collage.
The first time you make a collage you will probably see a pile of pictures scattered randomly. I don't often use this "Picture Pile" option - I prefer the mosaic option but have a play with all the of the types of collages by clicking on the drop down arrow.
Choose what size you want your final collage to be - if you are going to print it out then select the appropriate size for your final print. You can choose landscape or portrait too (just under "page format").
If you are not happy with the layout, try "shuffle", or alternatively you can click and drag an image to a different position and the images will swap places. I've found that by playing around with the page format and switching between landscape and portrait I can get the layout I like best.
If you want to remove an image simply select it in the collage and click on "remove" just above the collage. There are a few other clever things you can do but I'll save those for a part II!
Once you are happy with the collage then go for it - click on "Create collage". It should only take a few seconds before you are looking at your masterpiece!
Have fun collaging! Watch out for the next blog on collages where we'll look at the following:
- Adding text to your collage
- Using funky colours for the borders
- Re-sizing for Facebook etc
- How to get your collage printed
By Jane Burkinshaw. Share this post by clicking on one of the Share buttons on the right hand side. I'd love to hear your comments too!


No comments:
Post a Comment